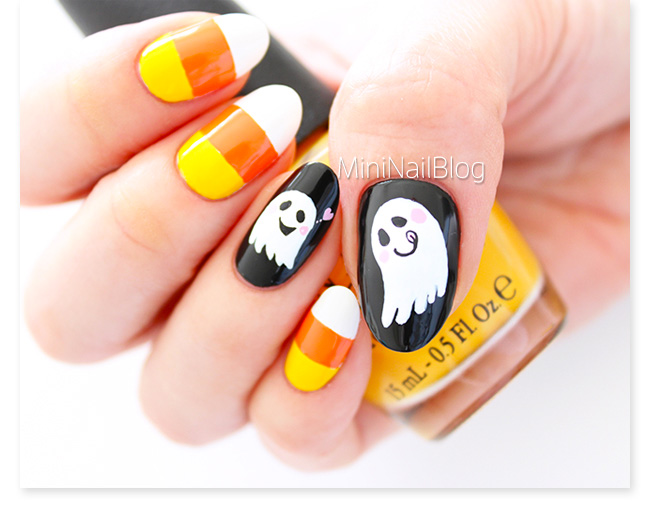
Sorry for skipping posting for the last few days! I’m back with candy corn nails!! Yaay!! I LOVE Halloween season because I get to do so many food related nail designs!! lol
And also it’s fun to draw ghosts and pumpkins for change, stepping away from flowers and strawberries 😀
Okay! This is the mini tutorial for this design.

- Apply white nail polish on the index, middle and pinky, then allow them to dry. Apply a strip of scotch tape horizontally.
- Apply yellow nail polish onto the base of the nail.
- Remove the tape.
- Apply another strip onto the free edge. Apply orange nail polish to cover the gap. You can create a cleaner line by applying the polish sideways first.
- Fill the gap between the tape and the yellow polish.
- Remove the tape.
- Apply black nail polish on the thumb and ring finger. Draw the silhouette of the ghost with white acrylic paint. This one looks like a foot lol
- Draw the face with black acrylic paint.
- Add pink onto the cheeks and tongue. Apply top coat to complete.
By the way, have you entered my Halloween giveaway?? If you like hand painting, I included the tiny paint brush in the package which is super useful to draw the fine details! And of course, cute Mickey Mouse nail art stickers too! If you haven’t yet, you must check it out!!
Thank you for visiting!! <3xxxxx


Oh my gawd! So CUTE!<3 Love the tutorial, your nails, everything!
WOW!! Thank you sooo very much for finding me and leaving such a sweet comment!!
I’m so happy that you like them!! Thank you VERY much!! <3xxx
you rock girl, this is beyond cute and awesome 😀
Awe, thank you so very much!!!